ping google.com
#install ssh
apt install openssh-server
#instal apache
apt install apache2
#direktori kerja apache2
/var/www/html/
#buat berkas web baru
nano /var/www/html/namafile.html/
#instal database mariadb
apt install mariadb-server
#beri password mariadb untuk user root
mariadb-secure-installation
#isinya
NOTE: RUNNING ALL PARTS OF THIS SCRIPT IS RECOMMENDED FOR ALL MariaDB
SERVERS IN PRODUCTION USE! PLEASE READ EACH STEP CAREFULLY!
In order to log into MariaDB to secure it, we'll need the current
password for the root user. If you've just installed MariaDB, and
haven't set the root password yet, you should just press enter here.
Enter current password for root (enter for none):
OK, successfully used password, moving on...
Setting the root password or using the unix_socket ensures that nobody
can log into the MariaDB root user without the proper authorisation.
You already have your root account protected, so you can safely answer 'n'.
Switch to unix_socket authentication [Y/n] n
... skipping.
You already have your root account protected, so you can safely answer 'n'.
Change the root password? [Y/n] y
New password:
Re-enter new password:
Password updated successfully!
Reloading privilege tables..
... Success!
By default, a MariaDB installation has an anonymous user, allowing anyone
to log into MariaDB without having to have a user account created for
them. This is intended only for testing, and to make the installation
go a bit smoother. You should remove them before moving into a
production environment.
Remove anonymous users? [Y/n] Y
... Success!
Normally, root should only be allowed to connect from 'localhost'. This
ensures that someone cannot guess at the root password from the network.
Disallow root login remotely? [Y/n] n
... skipping.
By default, MariaDB comes with a database named 'test' that anyone can
access. This is also intended only for testing, and should be removed
before moving into a production environment.
Remove test database and access to it? [Y/n] Y
- Dropping test database...
... Success!
- Removing privileges on test database...
... Success!
Reloading the privilege tables will ensure that all changes made so far
will take effect immediately.
Reload privilege tables now? [Y/n] Y
... Success!
Cleaning up...
All done! If you've completed all of the above steps, your MariaDB
installation should now be secure.
Thanks for using MariaDB!
#masuk mariadb
mariadb -u root -p
Enter password:
Welcome to the MariaDB monitor. Commands end with ; or \g.
Your MariaDB connection id is 40
Server version: 10.11.7-MariaDB-2ubuntu2 Ubuntu 24.04
Copyright (c) 2000, 2018, Oracle, MariaDB Corporation Ab and others.
Type 'help;' or '\h' for help. Type '\c' to clear the current input statement.
#buat file php
nano /var/www/html/info.php
#isinya
<?php
phpinfo();
?>
<?php
phpinfo();
?>
#instal PHP
apt install php
apt install php-mbstring php-zip php-gd php-json php-curl
apt install php8.3 -y
apt install libapache2-mod-php php8.3-common php8.3-cli php8.3-mbstring php8.3-bcmath php8.3-fpm php8.3-mysql php8.3-zip php8.3-gd php8.3-curl php8.3-xml -y
#instal phpmyadmin
apt install phpmyadmin
#akses phpmyadmin
192.168.26.43/phpmyadmin
#cek konfigurasi ip address statis
ls /etc/netplan/
#isinya /etc/netplan
50-cloud-init.yaml
#seting ip statis
buat salinan dulu
cp /etc/netplan/50-cloud-init.yaml /etc/netplan/50-cloud-init.yaml.salinan
#mulai seting ip statis menjadi 192.168.26.43/24
nano /etc/netplan/50-cloud-init.yaml
#isinya
# This file is generated from information provided by the datasource. Changes
# to it will not persist across an instance reboot. To disable cloud-init's
# network configuration capabilities, write a file
# /etc/cloud/cloud.cfg.d/99-disable-network-config.cfg with the following:
# network: {config: disabled}
network:
version: 2
renderer: networkd
ethernets:
enp0s3:
dhcp4: no
addresses:
- 192.168.26.43/24
routes:
- to: default
via: 192.168.26.1
nameservers:
addresses: [1.1.1.1, 8.8.8.8]
#aplikasikan konfigurasi ip statis
netplan apply
#cek ip address
ip addr
#instal dns server (bind9)
apt install bind9
#konfigurasi bind9
cp /etc/bind/named.conf.local //etc/bind/named.conf.local.salinan
nano /etc/bind/named.conf.local
#isinya
//
// Do any local configuration here
//
// Consider adding the 1918 zones here, if they are not used in your
// organization
//include "/etc/bind/zones.rfc1918";
//ip address saya 192.168.26.43 maka reversenya 43.26.168.192
zone "23758000andisaptono.ac.id"{
type master;
file "/etc/bind/db.23758000andisaptono.ac.id.db";
};
zone "26.168.192.in-addr.arpa" IN {
type master;
file "/etc/bind/db.43.db";
};
#konfigurasi forward
cp /etc/bind/db.local /etc/bind/db.23758000andisaptono.ac.id.db
nano /etc/bind/db.23758000andisaptono.ac.id.db
#isinya
;
; BIND data file for local loopback interface
;
$TTL 604800
@ IN SOA ns.23758000andisaptono.ac.id. root.23758000andisaptono.ac.id. (
2 ; Serial
604800 ; Refresh
86400 ; Retry
2419200 ; Expire
604800 ) ; Negative Cache TTL
;
@ IN NS ns.23758000andisaptono.ac.id.
@ IN A 192.168.26.43
@ IN AAAA ::1
ns IN A 192.168.26.43
www IN A 192.168.26.43
#konfigurasi reverse
cp /etc/bind/db.127 /etc/bind/db.43.db
nano /etc/bind/db.43.db
#isinya
;
; BIND reverse data file for local loopback interface
;
$TTL 604800
@ IN SOA ns.23758000andisaptono.ac.id. root.23758000andisaptono.ac.id. (
1 ; Serial
604800 ; Refresh
86400 ; Retry
2419200 ; Expire
604800 ) ; Negative Cache TTL
;
@ IN NS ns.23758000andisaptono.ac.id.
43.26.168 IN PTR 23758000andisaptono.ac.id.
#restart servis bind9
systemctl restart bind9
#cek statusnya
systemctl status bind9
systemctl status bind9
#pastikan Active: active (running)
● named.service - BIND Domain Name Server
Loaded: loaded (/usr/lib/systemd/system/named.service; enabled; preset: enabled)
Active: active (running) since Wed 2024-05-22 01:52:10 UTC; 5s ago
#tanam ip dns server pada pc pengujian, misal diuji dari server
nano /etc/resolv.conf
#ganti bagian ini
nameserver 192.168.26.43
#uji dns server
#pengujian 1
nslookup 23758000andisaptono.ac.id
Server: 192.168.26.43
Address: 192.168.26.43#53
Name: 23758000andisaptono.ac.id
Address: 192.168.26.43
Name: 23758000andisaptono.ac.id
#pengujian 2
dig 23758000andisaptono.ac.id
; <<>> DiG 9.18.24-0ubuntu5-Ubuntu <<>> 23758000andisaptono.ac.id
;; global options: +cmd
;; Got answer:
;; ->>HEADER<<- opcode: QUERY, status: NOERROR, id: 22844
;; flags: qr aa rd ra; QUERY: 1, ANSWER: 1, AUTHORITY: 0, ADDITIONAL: 1
;; OPT PSEUDOSECTION:
; EDNS: version: 0, flags:; udp: 1232
; COOKIE: 3c0974a1f5eab68701000000664d509057086d3ab07c0714 (good)
;; QUESTION SECTION:
;23758000andisaptono.ac.id. IN A
;; ANSWER SECTION:
23758000andisaptono.ac.id. 604800 IN A 192.168.26.43
;; Query time: 0 msec
;; SERVER: 192.168.26.43#53(192.168.26.43) (UDP)
;; WHEN: Wed May 22 01:55:28 UTC 2024
;; MSG SIZE rcvd: 98
#pengujian 3
ping 23758000andisaptono.ac.id
PING 23758000andisaptono.ac.id (::1) 56 data bytes
64 bytes from ip6-localhost (::1): icmp_seq=1 ttl=64 time=0.030 ms
64 bytes from ip6-localhost (::1): icmp_seq=2 ttl=64 time=0.022 ms
64 bytes from ip6-localhost (::1): icmp_seq=3 ttl=64 time=0.022 ms
64 bytes from ip6-localhost (::1): icmp_seq=4 ttl=64 time=0.021 ms
64 bytes from ip6-localhost (::1): icmp_seq=5 ttl=64 time=0.021 ms
64 bytes from ip6-localhost (::1): icmp_seq=6 ttl=64 time=0.024 ms
^C
--- 23758000andisaptono.ac.id ping statistics ---
6 packets transmitted, 6 received, 0% packet loss, time 5109ms
rtt min/avg/max/mdev = 0.021/0.023/0.030/0.003 ms
#pengujian 4 dari PC lain, pastikan IP address bisa ping terlebih dahulu
#Sprint 2
#cek tanggal jam dan menit
date
Tue May 28 07:51:08 AM WIB 2024
#list zona waktu
timedatectl list-timezones
#seting zona waktu
timedatectl set-timezone Asia/Jakarta
#instal ftp server
apt install vsftpd
#salin file konfigurasi vsftpd
cp /etc/vsftpd.conf /etc/vsftpd.conf.salinan
#modifikasi file konfigurasi
nano /etc/vsftpd.conf
#pastikan perubahan pada bagian ini saja
listen=NO
write_enable=YES
local_umask=022
xferlog_enable=YES
chown_uploads=YES
xferlog_file=/var/log/vsftpd.log
idle_session_timeout=600
data_connection_timeout=120
ascii_upload_enable=YES
ascii_download_enable=YES
ftpd_banner=Selamat datang di server FTP Andi Saptono.
chroot_local_user=YES
ls_recurse_enable=YES
#pada bagian paling akhir file konfigurasi tambahkan perintah berikut
allow_writeable_chroot=YES
#restart service vsftpd
systemctl restart vsftpd
#cek status service vsftpd, pastikan Active: actice (running)
systemctl status vsftpd
● vsftpd.service - vsftpd FTP server
Loaded: loaded (/usr/lib/systemd/system/vsftpd.service; enabled; preset: enabled)
Active: active (running) since Mon 2024-05-27 16:06:09 WIB; 3s ago
#buat user baru untuk upload datang
adduser webbaru
info: Adding user `webbaru' ...
info: Selecting UID/GID from range 1000 to 59999 ...
info: Adding new group `webbaru' (1001) ...
info: Adding new user `webbaru' (1001) with group `webbaru (1001)' ...
info: Creating home directory `/home/webbaru' ...
info: Copying files from `/etc/skel' ...
New password:
Retype new password:
passwd: password updated successfully
Changing the user information for webbaru
Enter the new value, or press ENTER for the default
Full Name []:
Room Number []:
Work Phone []:
Home Phone []:
Other []:
Is the information correct? [Y/n] Y
info: Adding new user `webbaru' to supplemental / extra groups `users' ...
info: Adding user `webbaru' to group `users' ...
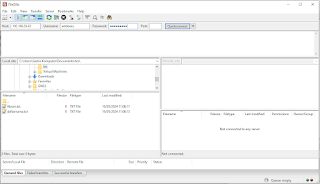
#install filezilla pada komputer kemudian jalankan. Jangan lupa untuk memberikan informasi username dan password yang digunakan
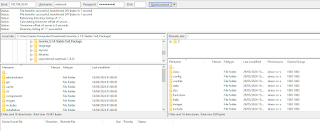
#user akan diarahkan ke home direktori dari username yang digunakan, misal username webbaru maka direktori akan aktif pada path /home/webbaru/. ektrak file wordpress yang sudah diunduh kemudian unggah ke server ingat, direktori kerja apache2 adalah /var/www/html/, sementara direktori kerja vsftpd pada username webbaru adalah /home/webbaru/. Maka bisa dibuatkan shortcut atau symbolic link dari direktori ftp ke direktori apache2 dengan perintah berikut.
ln -s /home/webbaru/ /var/www/html/
#jangan lupa berikan hak akses pada direktori /home/webbaru/ agar file dapat diakses
chmod 755 /home/webbaru/
#buat subdomain untuk web baru dengan nama http://webbaru.23758000andisaptono.ac.id/ dengan perintah berikut
nano /etc/bind/db.23758000andisaptono.ac.id.db
#isinya
;
; BIND data file for local loopback interface
;
$TTL 604800
@ IN SOA ns.23758000andisaptono.ac.id. root.23758000andisaptono.ac.id. (
2 ; Serial
604800 ; Refresh
86400 ; Retry
2419200 ; Expire
604800 ) ; Negative Cache TTL
;
@ IN NS ns.23758000andisaptono.ac.id.
@ IN A 192.168.26.43
@ IN AAAA ::1
ns IN A 192.168.26.43
www IN A 192.168.26.43
webbaru IN A 192.168.26.43
#restart service bind9
systemctl restart bind9
#arahkan subdomain web baru ke root direktori web /var/www/html/webbaru/
cd /etc/apache2/sites-available/
cp 000-default.conf webbaru.23758000andisaptono.ac.id.conf
nano webbaru.23758000andisaptono.ac.id.conf
#isinya
<VirtualHost *:80>
# The ServerName directive sets the request scheme, hostname and port that
# the server uses to identify itself. This is used when creating
# redirection URLs. In the context of virtual hosts, the ServerName
# specifies what hostname must appear in the request's Host: header to
# match this virtual host. For the default virtual host (this file) this
# value is not decisive as it is used as a last resort host regardless.
# However, you must set it for any further virtual host explicitly.
ServerName webbaru.23758000andisaptono.ac.id
ServerAdmin webmaster@localhost
DocumentRoot /var/www/html/webbaru/
#aktifkan konfigurasi virtual host apache2
a2ensite webbaru.23758000andisaptono.ac.id.conf
#reload service dari apache2
systemctl reload apache2
#cek status apache2, pastikan active running
systemctl status apache2
● apache2.service - The Apache HTTP Server
Loaded: loaded (/usr/lib/systemd/system/apache2.service; enabled; preset: enabled)
Active: active (running) since Mon 2024-05-27 15:50:09 WIB; 41min ago
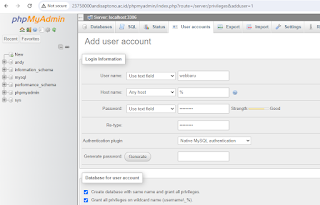
#buat database baru beserta usernamenya pada mariadb melalui phpmyadmin
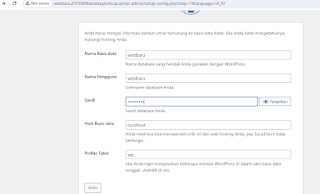
#install wordpress dengan memberikan informasi databasu yang baru dibuatkan
#salin konfigurasi wp-config.php dan masukkan kedalam direktori wordpress dengan nama file wp-config.php
#Sprint 3
#instal aplikasi postfix
apt install postfix
#ikuti promt berikut
ok
Internet Site
23758000andisaptono.ac.id
#lanjutkan reconfigure postfix
dpkg-reconfigure postfix
#ikuti promt berikut
ok
Internet Site
23758000andisaptono.ac.id
#kosongkan bagian "Recipient for root and postmaster mail:"
#pastikan "23758000andisaptono.ac.id" ada pada bagian paling depan
#Force synchronous updates on mail queue? pilih yes
#masukkan ip address server pada bagian paling depan 192.168.26.43/24
#Mailbox size limit (bytes): isi dengan nilai 0 untuk set unlimited mail box
#Local address extension character: isi dengan karakter "+"
#Internet protocols to use: pilih "all"
#lanjutkan instalasi mailstack dovecot
apt -y install dovecot-core dovecot-pop3d dovecot-imapd
#rubah konfigurasi dovecot
nano /etc/dovecot/dovecot.conf
#hapus tanda "#" pada bagian ini kemudian simpan
listen = *, ::
#lanjutkan rubah konfigurasi pada dovecot
nano /etc/dovecot/conf.d/10-auth.conf
#hapus tanda "#" pada bagian ini kemudian simpan
disable_plaintext_auth = yes #rubah dari "yes" menjadi "no"
auth_mechanisms = plain login #tambahkan perintah "login" dan simpan konfigurasi
#lanjutkan konfigurasi dovecot
nano /etc/dovecot/conf.d/10-mail.conf
#hapus tanda "#" pada bagian ini kemudian simpan
mail_location = maildir:~/Maildir
#lanjutkan konfigurasi dovecot
nano /etc/dovecot/conf.d/10-master.conf
#hapus tanda "#" pada bagian ini dan tambahkan baris kode berikut kemudian simpan
# Postfix smtp-auth
unix_listener /var/spool/postfix/private/auth {
mode = 0666
user = postfix
group = postfix
}
#restart aplikasi dovecot
systemctl restart dovecot
#download aplikasi roundcubemail versi complete dan rename menjadi roudcube.tar.gz
https://roundcube.net/download/
#buat user baru dengan nama webmail
adduser webmail
info: Adding user `webmail' ...
info: Selecting UID/GID from range 1000 to 59999 ...
info: Adding new group `webmail' (1003) ...
info: Adding new user `webmail' (1003) with group `webmail (1003)' ...
info: Creating home directory `/home/webmail' ...
info: Copying files from `/etc/skel' ...
New password:
Retype new password:
passwd: password updated successfully
Changing the user information for webmail
Enter the new value, or press ENTER for the default
Full Name []:
Room Number []:
Work Phone []:
Home Phone []:
Other []:
Is the information correct? [Y/n] Y
info: Adding new user `webmail' to supplemental / extra groups `users' ...
info: Adding user `webmail' to group `users' ...
#upload aplikasi roundcube.tar.gz menggunakan filezilla seperti upload web sebelumnya
#ekstrak file roundcube.tar.gz menggunakan perintah pastikan hasilnya menjadi folder dengan nama "roundcube"
tar -xzvf roundcube.tar.gz
#buat symbolic link dari /home/webmail/ ke /var/www/html
ln -s /home/webmail/ /var/www/html/
#rubah konfigurasi bind9 dengan perintah
nano /etc/bind/db.23758000andisaptono.ac.id.db
#berikan hak akses pada direktori /home/webmail/
chmod 755 /home/webmail/
#buat subdomain baru dengan nama webmail dengan menambahkan baris berikut pada konfigurasi bind9
;
; BIND data file for local loopback interface
;
$TTL 604800
@ IN SOA ns.23758000andisaptono.ac.id. root.23758000andisaptono.ac.id. (
2 ; Serial
604800 ; Refresh
86400 ; Retry
2419200 ; Expire
604800 ) ; Negative Cache TTL
;
@ IN NS ns.23758000andisaptono.ac.id.
@ IN A 192.168.26.43
@ IN AAAA ::1
ns IN A 192.168.26.43
www IN A 192.168.26.43
webbaru IN A 192.168.26.43
webmail IN A 192.168.26.43
#restart service bind9
systemctl restart bind9
#pindah direktori kerja menuju /etc/apache2/sites-available/
cd /etc/apache2/sites-available/
#tambahkan koonfigurasi virtual host untuk webmail
cp 000-default.conf webmail.23758000andisaptono.ac.id.conf
nano webmail.23758000andisaptono.ac.id.conf
#rubah isinya pada bagian ServerName dan DocumentRoot kemudian simpan
<VirtualHost *:80>
# The ServerName directive sets the request scheme, hostname and port that
# the server uses to identify itself. This is used when creating
# redirection URLs. In the context of virtual hosts, the ServerName
# specifies what hostname must appear in the request's Host: header to
# match this virtual host. For the default virtual host (this file) this
# value is not decisive as it is used as a last resort host regardless.
# However, you must set it for any further virtual host explicitly.
ServerName webmail.23758000andisaptono.ac.id
ServerAdmin webmaster@localhost
DocumentRoot /var/www/html/webmail/roundcube/
#aktifkan konfigurasi virtual host untuk webmail
a2ensite webmail.23758000andisaptono.ac.id.conf
#reload apache2 dengan perintah
systemctl reload apache2
#install php intl
apt install php8.3-intl
#buat user dan database baru melaui phpmyadmin
#install aplikasi roundcube webmail melalui alamat
http://webmail.23758000andisaptono.ac.id/installer/
#masukkan konfigurasi database pada roundcube
#masukkan konfigurasi smtp pada roundcube
#masukkan konfigurasi imap pada roundcube
#Hapus atau rename direktori installer roundcube melalui filezilla
http://webmail.23758000andisaptono.ac.id/
#Sprint 4
#instal aplikasi rsyslog
apt install rsyslog
#rubah konfigurasi rsyslog
nano /etc/rsyslog.conf
#hapus tanda pagar pada bagian berikut
# provides UDP syslog reception
module(load="imudp")
input(type="imudp" port="514")
# provides TCP syslog reception
module(load="imtcp")
input(type="imtcp" port="514")
#tambahkan baris kode berikut
$template remote-incoming-logs,"/var/log/%HOSTNAME%/%PROGRAMNAME%.log"
*.* ?remote-incoming-logs
& ~
#restart service dari rsyslog
systemctl restart rsyslog
#download mikrotik cloud host roouter ova dan winbox melalui link berikut kemudian import ke virtualbox, pastikan interfacenya bridge
#masuk menu system login pada mikrotik
#masukkan ip syslog server pada bagian action>>remote
#arahkan Rules >> log ke remote
#log akan tersimpan di direktori /var/log/, coba masuk ke direktori tersebut
cd /var/log/
#terdapat direktori dengan nama IP Address perangkat yang lognya diarahkan ke rsyslog server
ls /var/log/
#direktorinya bernama 192.168.26.11
192.168.26.11 btmp dmesg.3.gz lastlog sysstat
alternatives.log btmp.1 dmesg.4.gz mail.log ubuntu-advantage.log
alternatives.log.1 cloud-init.log dpkg.log mail.log.1 ubuntu-advantage.log.1
andy-srv cloud-init-output.log dpkg.log.1 php8.0-fpm.log unattended-upgrades
apache2 dbconfig-common faillog php8.3-fpm.log vsftpd.log
apport.log dist-upgrade installer php8.3-fpm.log.1 vsftpd.log.1
apt dmesg journal private wtmp
auth.log dmesg.0 kern.log README
auth.log.1 dmesg.1.gz kern.log.1 syslog
bootstrap.log dmesg.2.gz landscape syslog.1
#isi direktori tersebut dapat dilihat dengan perintah dimana didalamnya terdapat 3 file yang mencatat log
ls -l /var/log/192.168.26.11/
total 12
-rw-r--r-- 1 syslog syslog 695 Jun 4 08:34 system,error,critical.log
-rw-r--r-- 1 syslog syslog 503 Jun 4 08:34 system,info,account.log
-rw-r--r-- 1 syslog syslog 170 Jun 4 08:22 system,info.log
#untuk membaca file log nya contoh system,error,critical.log, dapat dilakukan dengan perintah
tail -f /var/log/192.168.26.11/system,error,critical.log
2024-06-04T08:22:57.802775+07:00 192.168.26.11 system,error,critical login failure for user andy from 192.168.26.39 via winbox
2024-06-04T08:24:34.747411+07:00 192.168.26.11 system,error,critical message repeated 4 times: [ login failure for user andy from 192.168.26.39 via winbox]
2024-06-04T08:25:08.628905+07:00 192.168.26.11 system,error,critical login failure for user admin from 192.168.26.39 via winbox
2024-06-04T08:25:22.102884+07:00 192.168.26.11 system,error,critical message repeated 3 times: [ login failure for user admin from 192.168.26.39 via winbox]
2024-06-04T08:34:36.442683+07:00 192.168.26.11 system,error,critical login failure for user joko from 192.168.26.39 via winbox
#Sprint 5
#instal aplikasi ntp
apt install ntp
#lakukan penyesuaian konfigurasi ntp dan pastikan alamat pool ntp terisi
nano /etc/ntpsec/ntp.conf
#isinya
# Use servers from the NTP Pool Project. Approved by Ubuntu Technical Board
# on 2011-02-08 (LP: #104525). See https://www.pool.ntp.org/join.html for
# more information.
pool 0.ubuntu.pool.ntp.org iburst
pool 1.ubuntu.pool.ntp.org iburst
pool 2.ubuntu.pool.ntp.org iburst
pool 3.ubuntu.pool.ntp.org iburst
# Use Ubuntu's ntp server as a fallback.
server ntp.ubuntu.com
#restart aplikasi ntp
systemctl restart ntp
#izinkan protokol ntp pada ubuntu firewall
ufw allow from any to any port 123 proto udp
#isikan informasi alamat server NTP pada mikrotik pada menu system>>SNTP Client
#masukkan timezone pada mikrotk melalui menu System >> Clock >> Time, pilih zona waktu Asia/Jakarta atau jika menggunakan Manual Time Zone bisa dimasukkan nilai +07:00
#Sprint 6
#instal snmp rrd tool
apt install -y snmp snmpd rrdtool librrds-perl php-snmp
#install cacti dan masukkan password serta pilih web server yang digunakan (apache2)
apt install -y cacti cacti-spine
#cek konfigurasi pastikan user dan password database sesuai dengan apa yang diisikan pada saat install cacti
nano /usr/share/cacti/site/include/config.php
#buat penjadwalan poller cacti menggunakan cronjob
sudo crontab -e
#tambahkan baris perintah berikut pada akhir file
*/5 * * * * /usr/bin/php /usr/share/cacti/site/poller.php > /dev/null 2>&1
#masuk kedalam cacti dengan username default admin dan password sama dengan password database pada saat install cacti
http://23758000andisaptono.ac.id/cacti/
#Aktifkan SNMP versi 2 pada mikrotik melalui menu IP >> SNMP
#Tambahkan perangkat pada cacti melalui menu Console >> Create >> New Device
Description : Nama Perangkat
Hostname : IP Address dari perangkat router mikrotik
Device Site Association : None
Device Template : Cisco Router
SNMP Version : 2
SNMP Community String : public #samakan dengan yang ada pada perankat router mikrotik
Downed Device Detection : Ping or SNMP Uptime
Selanjutnya tekan tombol "Create"
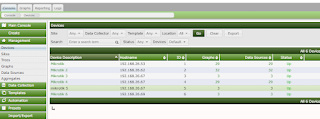
#Cek perangkat yang sudah ditambahkan pada cacti melalui menu Console >> Management >> Device kemudian pilih perangkat yang dituju
#Pilih menu "Create graph for this Device"
#Ceklis interface yang dituju, kemudian pilih mode "In/out Bits" dan lanjutkan dengan tombol "Create"
#Kembali ke menu cek perangkat yang sudah ditambahkan pada cacti melalui menu Console >> Management >> Device kemudian pilih perangkat yang dituju, kemudian ceklis perangkat yang dituju dan pilih menu "Place on a Tree (Default Tree)" dan tekan tombol "Go" kemudian continue
#tampilkan grafik snmp pada menu "Graph" kemudian pilih device yang akan ditampilkan
#catatan akan lebih sempurna jika cacti ditambahkan sub-domain (bind9) dan konfigurasi virtual-host (apache2) seperti pada web sebelumnya.


